
Google Sheets Grid Integration
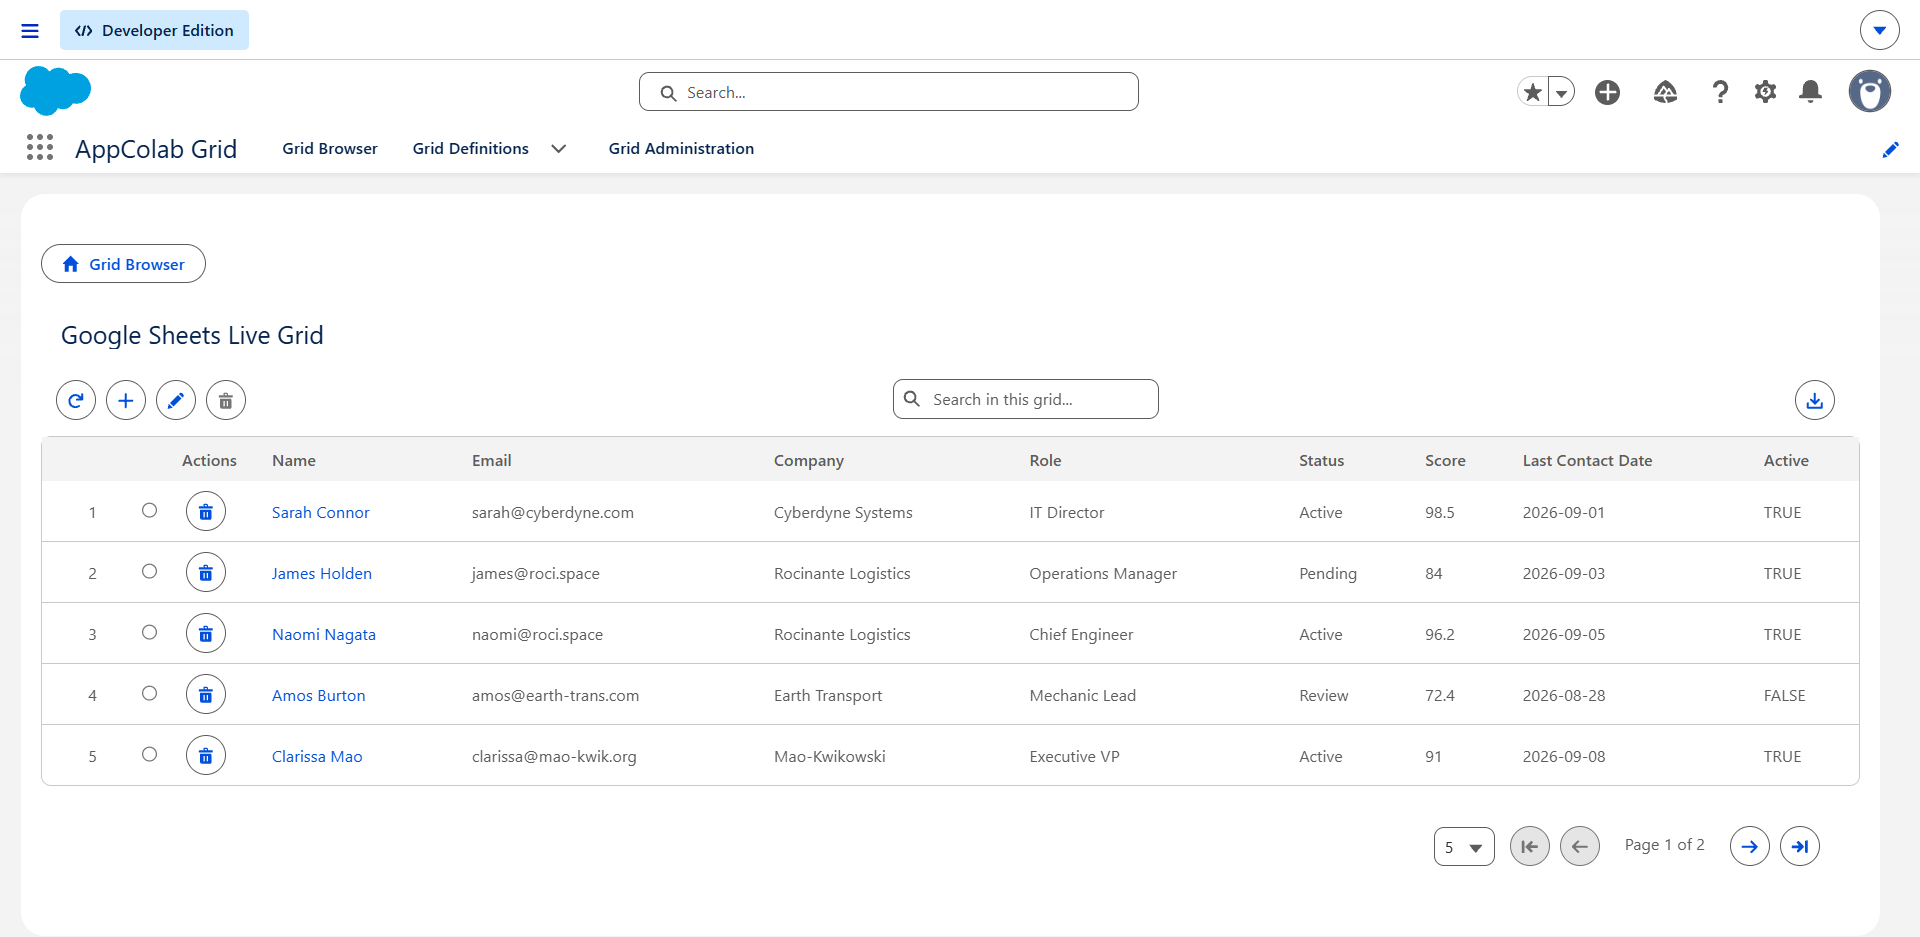
The Google Sheets Grid integration allows users to view, search, add, inline-edit, delete, and download rows from any Google Spreadsheet directly inside the AppColab Grid UI—in real time, without copying or duplicating rows in Salesforce database storage.
What’s Deployed
| Component | Name | Purpose |
|---|---|---|
| Named Credential | Google_Sheets |
Connects to https://sheets.googleapis.com via Google_APIs External Credential |
| External Credential | Google_APIs |
Manages OAuth 2.0 authentication to Google APIs |
| Auth Provider | Google_OAuth |
Salesforce Auth Provider connecting to Google Cloud OAuth 2.0 Client |
| Apex Client | GoogleSheetsClient.cls |
REST client supporting getValues, batchUpdateValues, appendValues, getSpreadsheet, and batchUpdate |
| Apex Data Provider | GoogleSheetsGridDataProvider.cls |
Implements appcg.GridDataProviderV1 and appcg.GridDataMutationProviderV1 with dynamic header parsing and full CRUD |
| Permission Set | Integration_Admin |
Grants access to the Google_APIs → Google_User principal |
One-Time Setup Guide
Connecting Google Sheets requires authorizing Salesforce to communicate with the Google Sheets REST API.
Step 1: Enable Google Sheets API & Scopes in Google Cloud
- Go to the Google Cloud Console.
- Select your project (or click New Project to create one, e.g.
AppColab Salesforce Integration). - Navigate to APIs & Services → Library:
- Search for Google Sheets API → click Enable.
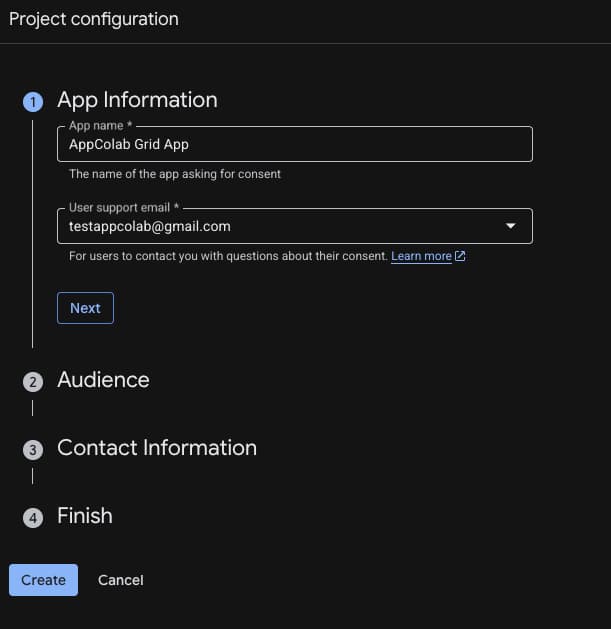
- Navigate to APIs & Services → OAuth consent screen:
- Create an app
- App name:
AppColab Grid Integration - User Type: External (or Internal for Google Workspace orgs).
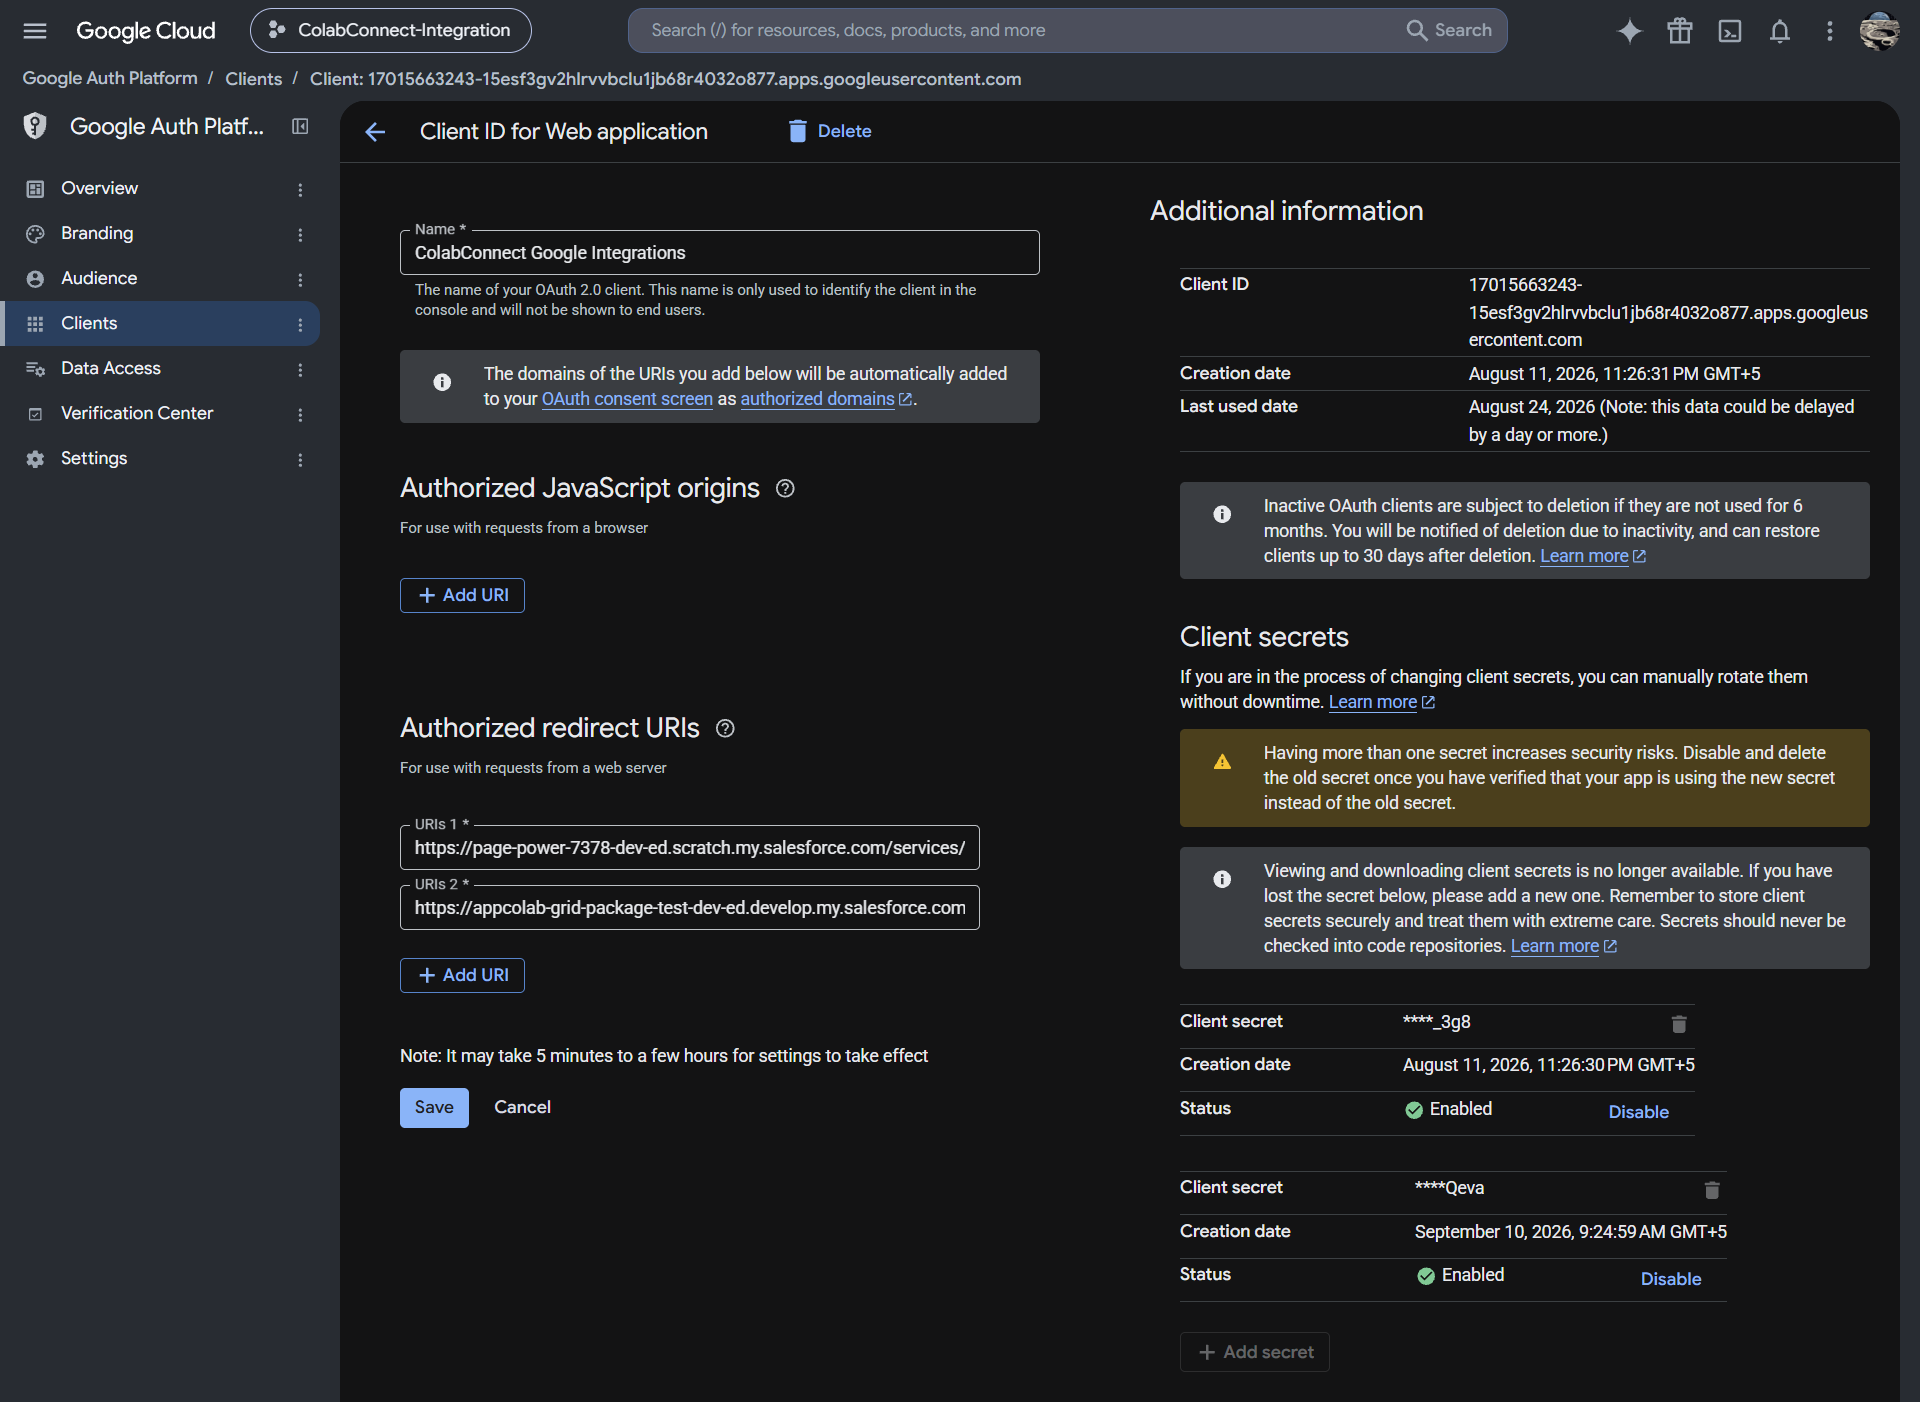
- Click “Create OAuth Client” or go to “Clients” -> create
- Application type: Web application
- Name:
AppColab Grid Integration - Click “Create”
- Note down “Client ID” and “Client Secret”
- Add Scope and Test Users
- Go to “Data Access” tab
- Click Add or Remove Scopes and add:
https://www.googleapis.com/auth/spreadsheets
- Under Audience -> Test Users, add your Google account email.
- Click Save and Continue.
- Compelete OAuth Client Setup:
- Go to Clients section again.
- Authorized redirect URIs: Paste your Salesforce Callback URL (found in Salesforce Setup → Auth. Providers →
Google_OAuth→Callback URL).
Step 2: Configure Salesforce Auth Provider & Credentials
2.1 Create the Auth. Provider
- In Salesforce Setup, enter Auth. Providers in the Quick Find box and click New:
- Provider Type:
Google - Name:
Google_OAuth - URL Suffix:
Google_OAuth - Consumer Key: Paste your Google Cloud Client ID from Step 1.
- Consumer Secret: Paste your Google Cloud Client Secret from Step 1.
- Default Scopes:
openid email https://www.googleapis.com/auth/spreadsheets - Click Save.
- Provider Type:
- Copy the Callback URL displayed at the bottom of the page and ensure it matches the authorized redirect URI in your Google Cloud Console.
2.2 Create the External Credential
- In Salesforce Setup, enter Named Credentials in Quick Find.
- Click the External Credentials tab → click New:
- Label:
Google APIs - Name:
Google_APIs - Authentication Protocol:
OAuth 2.0 - Authentication Provider: Select
Google_OAuth - Click Save.
- Label:
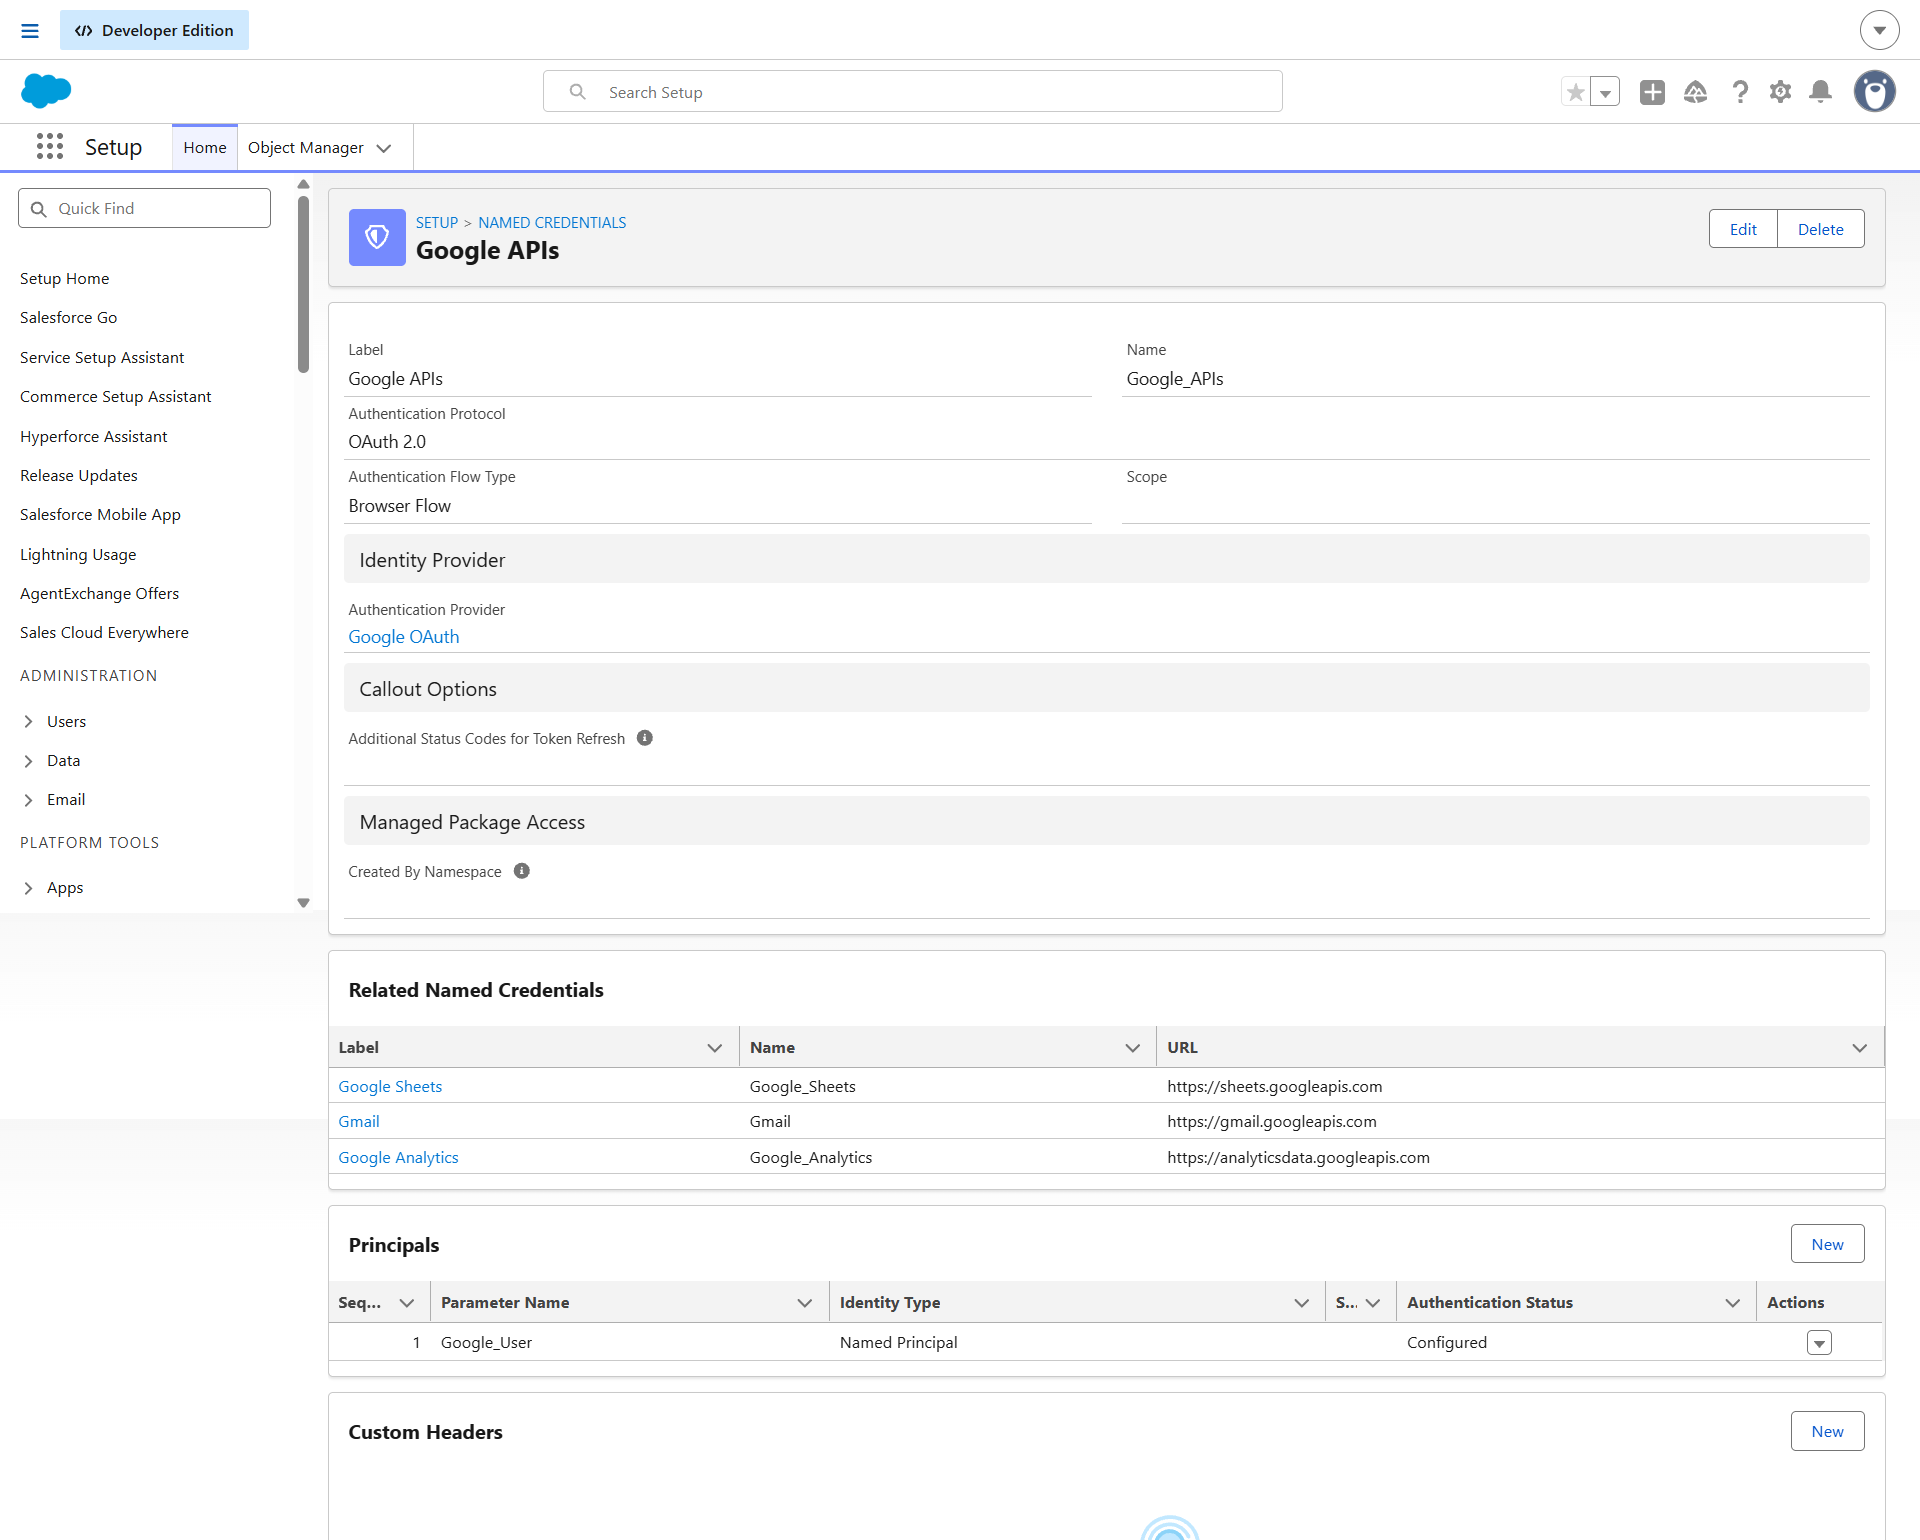
- Under the Principals section, click New:
- Parameter Name:
Google_User - Sequence:
1 - Click Save.
- Parameter Name:
- Click the dropdown arrow
▼next toGoogle_User→ click Authenticate. - Log into your Google account and grant spreadsheet permissions. (Status will change to Configured).
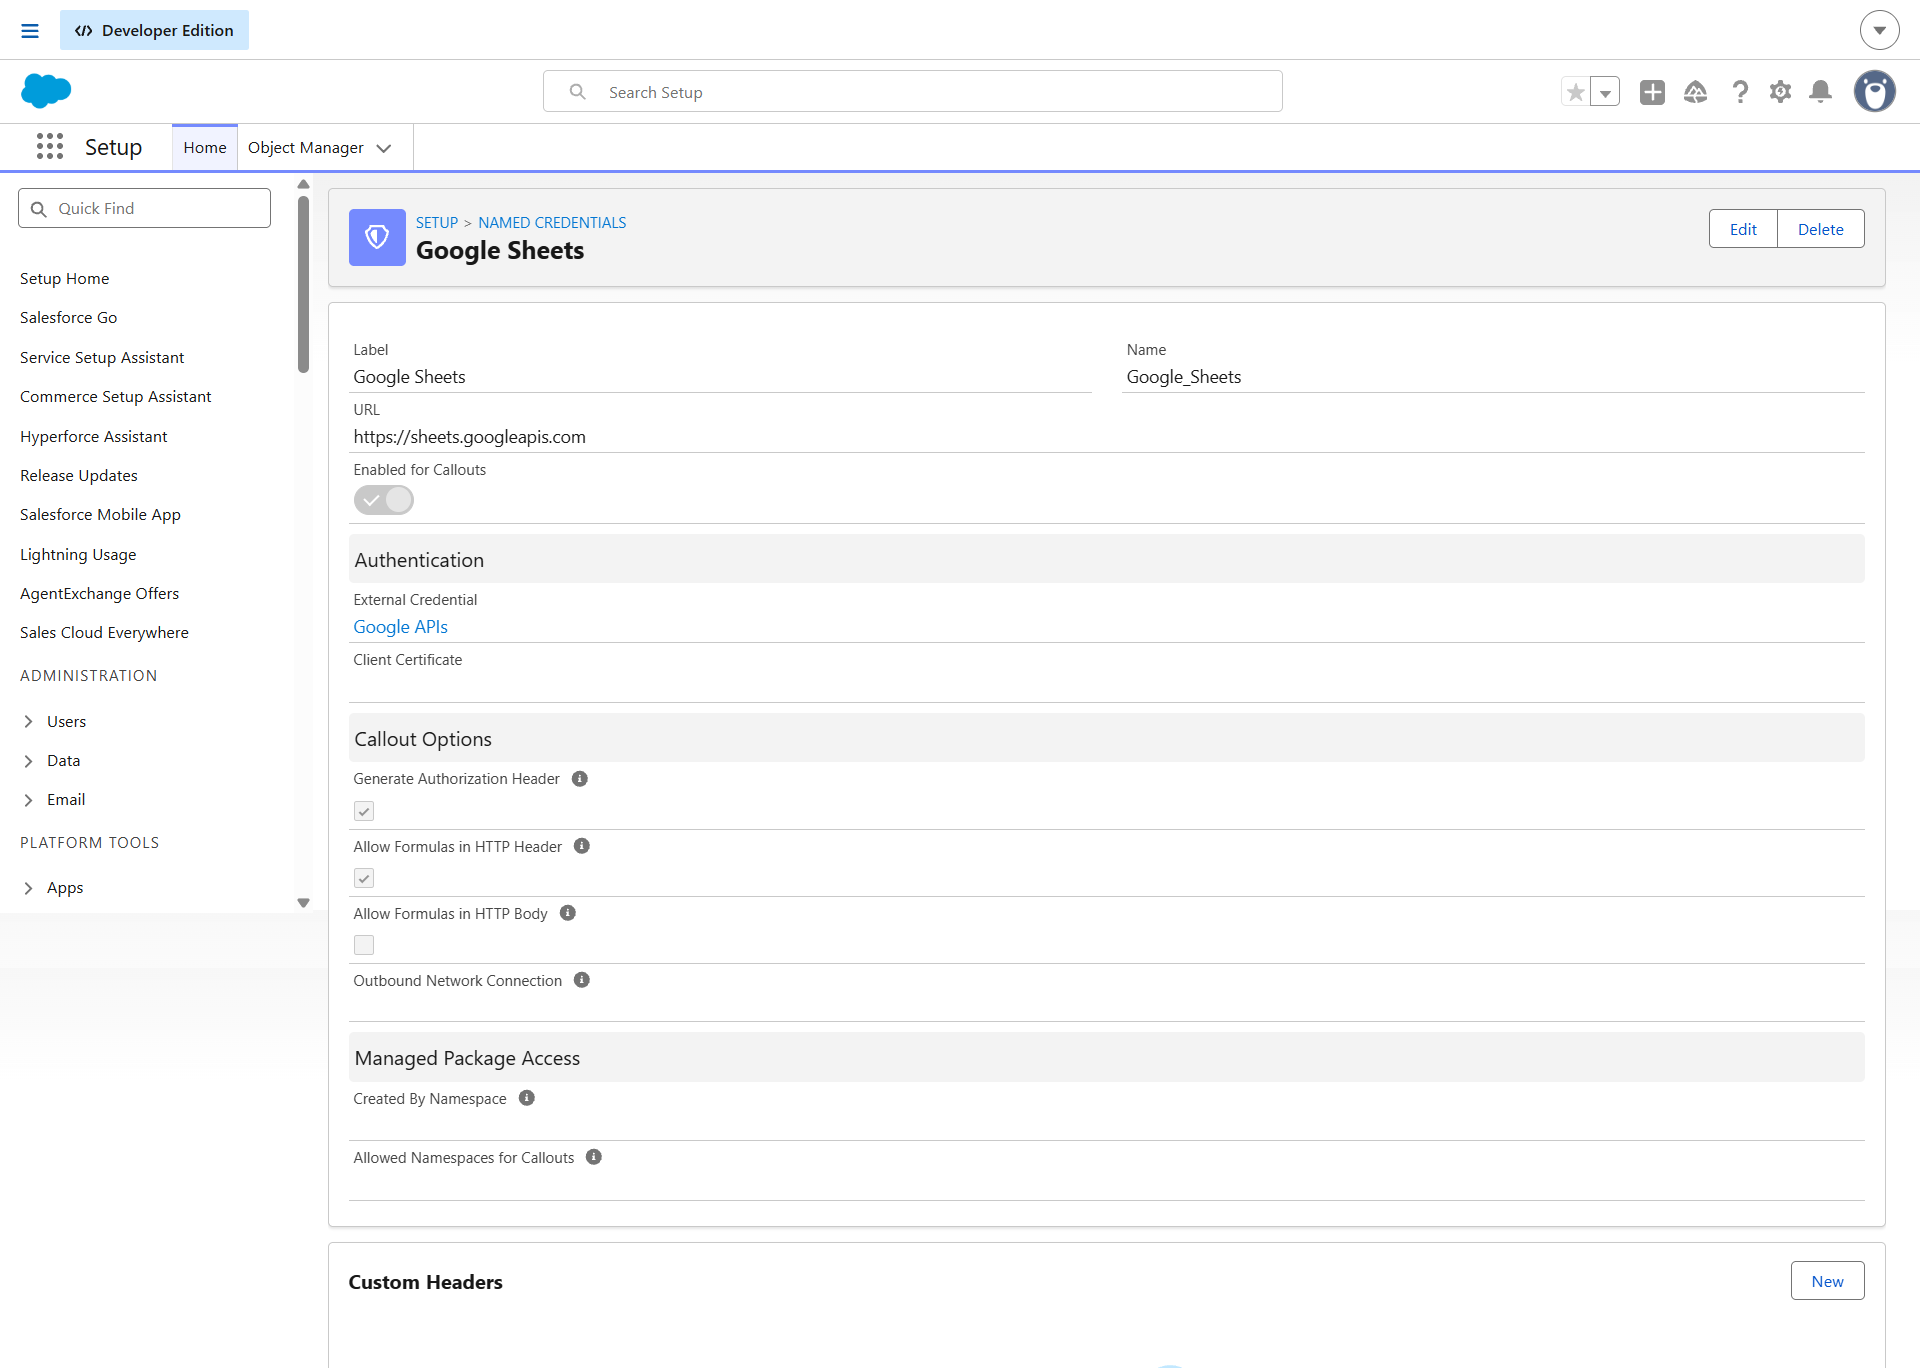
2.3 Create the Named Credential
- Click the Named Credentials tab → click New:
- Label:
Google Sheets - Name:
Google_Sheets - URL:
https://sheets.googleapis.com - External Credential: Select
Google APIs - Generate Authorization Header: Checked
- Allow Formulas in HTTP Header: Checked
- Label:
- Click Save.
Step 3: Assign Permission Set Access
- Setup → Permission Sets → click Integration Admin.
- Click External Credential Principal Access and ensure
Google_APIs - Google_Useris enabled. - Click Manage Assignments and assign the permission set to your user.
Creating a Google Sheets Grid Definition
- In Salesforce, open the AppColab Grid app → go to the Grid Definitions tab → click New Grid Definition.
- Fill in:
- Grid Settings Name:
Google_Sheets_Grid - Grid Label:
Google Sheets Live Grid - Is Active?: Checked
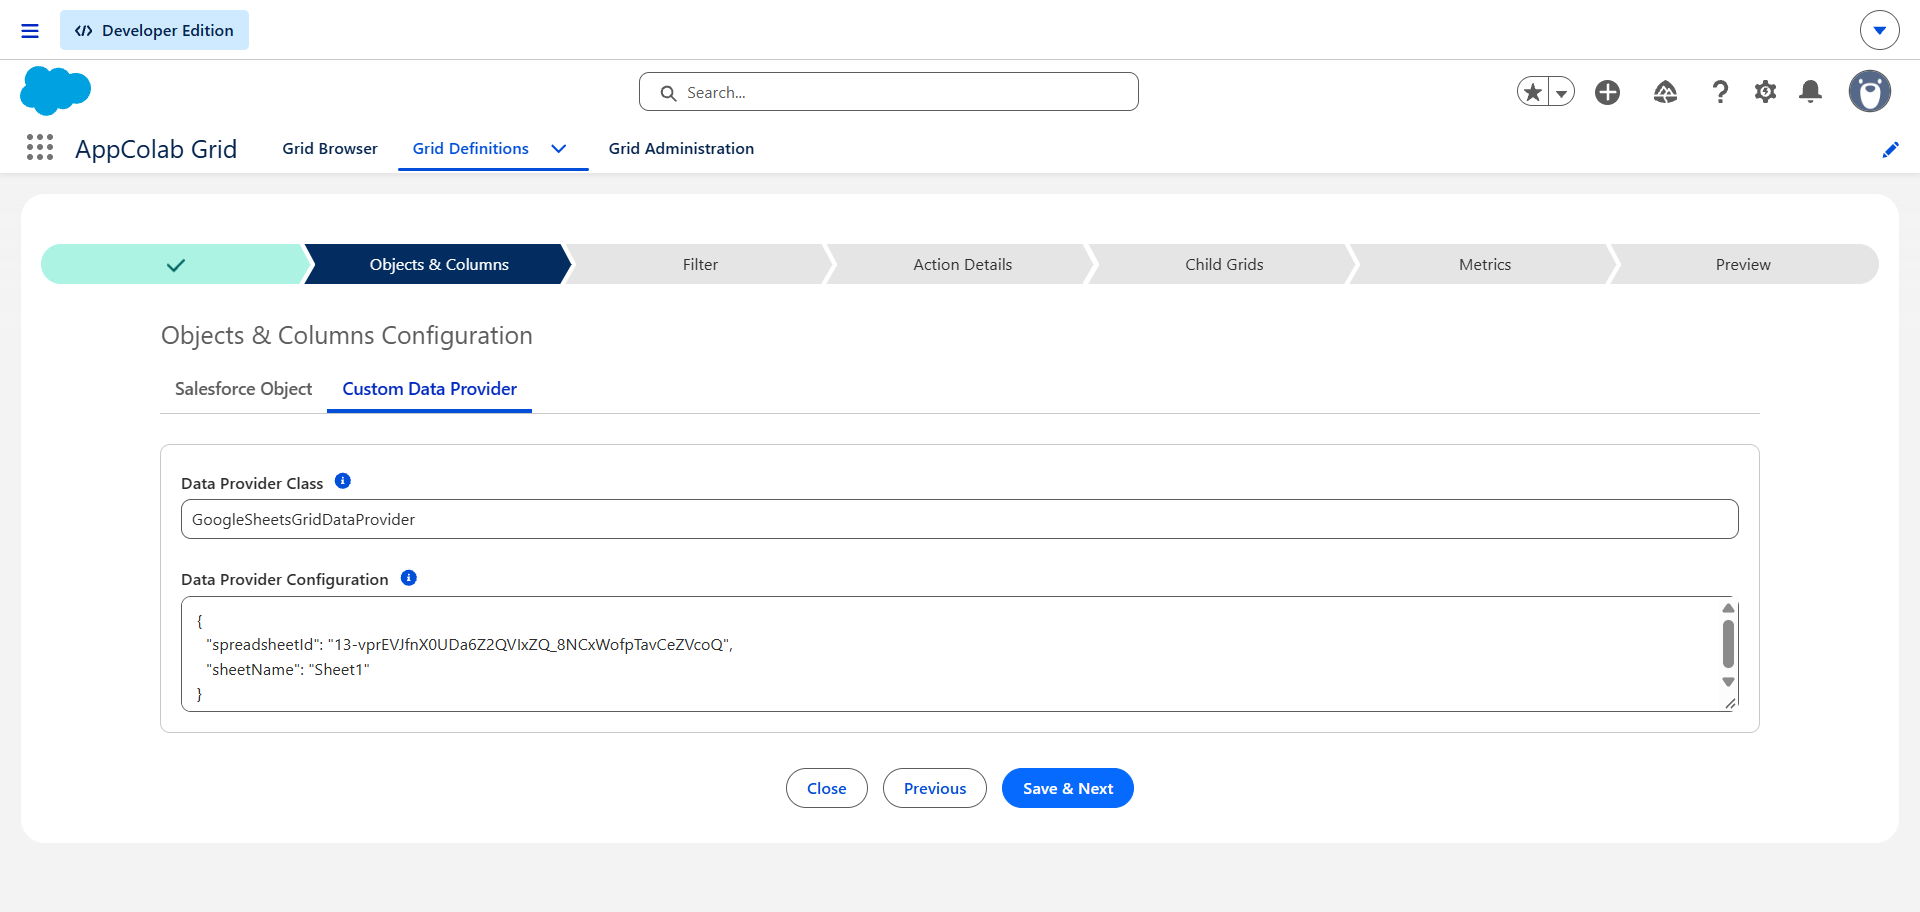
- Data Provider Class:
GoogleSheetsGridDataProvider - Data Provider Configuration:
{
  "spreadsheetId": "YOUR_SPREADSHEET_ID",
  "sheetName": "Onboarding",
  "headerRow": 1,
  "parentMatchColumn": "Salesforce Account Id",
  "parentMatchField": "Id",
  "autoPopulateParent": true
}
How to find your
spreadsheetId:
Open your spreadsheet in Google Sheets and look at the browser address bar:
https://docs.google.com/spreadsheets/d/1BxiMVs0XRA5nFMdKvBdBZjgmUUqptlbs74OgvE2upms/edit
The long string between/d/and/editis yourspreadsheetId.
- Grid Settings Name:
- Click Save & Next → proceed to Preview.
- The Grid automatically discovers all column names from Row 1 of your sheet and renders all live data rows!
Provider configuration options
| Property | Required | Description |
|---|---|---|
spreadsheetId |
Yes | The ID from the Google Sheets URL. |
sheetName |
No | The tab to read. Defaults to Sheet1. |
headerRow |
No | The one-based row containing column names. Defaults to 1. |
parentMatchColumn |
No | Exact sheet header used to relate a row to the current Salesforce record, such as Salesforce Account Id. |
parentMatchField |
No | Salesforce field whose value is compared with parentMatchColumn. Defaults to Id; a field such as Customer_Code__c can be used for an external key. |
autoPopulateParent |
No | When true, a row added from a record page or child grid receives the current parent value automatically. The match column is read-only while in that context. |
The three parent options are optional. Existing configurations containing only spreadsheetId and sheetName continue to display the complete sheet.
Scope sheet rows to a Salesforce record
Add a column to the sheet whose header exactly matches parentMatchColumn. For an Account-based grid using the example configuration above, populate that column with Salesforce Account IDs.
When AppColab Grid is placed on an Account record page, it passes the Account ID to the provider. The provider returns only rows whose Salesforce Account Id cell matches that ID. When the same Grid Definition is used on an app or home page without record context, it returns the complete sheet.
To use the Google Sheets grid beneath a Salesforce parent grid:
- Give the Google Sheets Grid Definition a non-empty Parent Relationship Field, such as
Salesforce Account Id, so it is available in the child-grid picker. - Open the Salesforce parent Grid Definition and add the Google Sheets Grid Definition on the Child Grids step.
- Expand a parent row. Its Salesforce record ID is passed to the Google Sheets provider and used for the match.
If the sheet stores a business key instead of a Salesforce ID, set parentMatchField to the corresponding accessible field on the parent object. For example, use Customer_Code__c when the sheet’s match column contains customer codes.
Supported Grid Features
| Feature | Provider Implementation | How It Works |
|---|---|---|
| Dynamic Headers | getValues(A1:Z1) |
Row 1 of your sheet is automatically discovered as column titles |
| Search | In-Memory Filter | Instant full-text searching across all sheet columns |
| Inline Edit | batchUpdateValues |
Editing cell values updates the exact sheet cell range (e.g. Sheet1!C4) on Save |
| Add Row | appendValues |
Click + Add Row to append new records to the bottom of the spreadsheet |
| Delete Row | batchUpdate (deleteDimension) |
Removes the selected row index from the sheet |
| CSV Export | AppColab Grid Core | Download filtered or complete sheet data as CSV |
Testing via Anonymous Apex
You can verify the connection without opening the UI by running this script in Developer Console (Debug → Open Execute Anonymous Window):
GoogleSheetsGridDataProvider provider = new GoogleSheetsGridDataProvider();
appcg.GridDataProviderTypesV1.ProviderContext ctx = new appcg.GridDataProviderTypesV1.ProviderContext();

// The provider reads its JSON configuration from this Grid Definition.
ctx.gridDefinitionId = [
    SELECT Id
    FROM appcg__Grid_Definition__c
    WHERE appcg__Grid_Identifier__c = 'Google_Sheets_Grid'
    LIMIT 1
].Id;

// Optional: provide record context to test parent-aware filtering.
// ctx.parentId = '001000000000001AAA';

// 1. Test capabilities and dynamic columns
appcg.GridDataProviderTypesV1.Capabilities caps = provider.getCapabilities(ctx);
System.debug('Discovered Columns: ' + caps.columns.size());

// 2. Test live data fetch
appcg.GridDataProviderTypesV1.QueryRequest req = new appcg.GridDataProviderTypesV1.QueryRequest();
req.context = ctx;
appcg.GridDataProviderTypesV1.PageResult page = provider.getData(req);
System.debug('Total Rows Returned: ' + page.totalCount);
ProviderContext contains gridDefinitionId and parentId. It does not contain provider configuration JSON; the provider loads appcg__Data_Provider_Config__c from the Grid Definition identified by gridDefinitionId.
Troubleshooting
401 / 403 AuthenticationException: The Google OAuth token has expired or is missing thespreadsheetsscope. Go to Setup → Named Credentials → External Credentials →Google APIs→ click Authenticate onGoogle_User.GridUiException: spreadsheetId is required: Verify that your Data Provider Configuration JSON contains valid"spreadsheetId"and"sheetName"properties.HTTP 404: Requested entity was not found: Ensure that the spreadsheet is shared with or accessible by the Google account authenticated in Salesforce Setup, and that thespreadsheetIdwas copied accurately.